Sunday, December 27, 2015

Gateaux Pithiviers -- still a winner, though not "officially"

 
This fall brought a big change to the Baking JDs -- after spending the past five years at two different law firms, Erica and Sara are now colleagues, in addition to baking partners.

This move has provided fun opportunities for mid-afternoon coffee breaks, outfit consultations, and post-work libations. It also presented the once-a-year chance to participate in our annual office baking challenge. We discussed the possibility of bringing our daring baker challenge before the December recipe even came out, and we were glad to see a beautiful cake appear for this month's challenge.

Due to the craziness of the holiday season, we prepared the component parts separately. Erica kindly offered to make the puff pastry. I had the much easier task of preparing the frangipane.


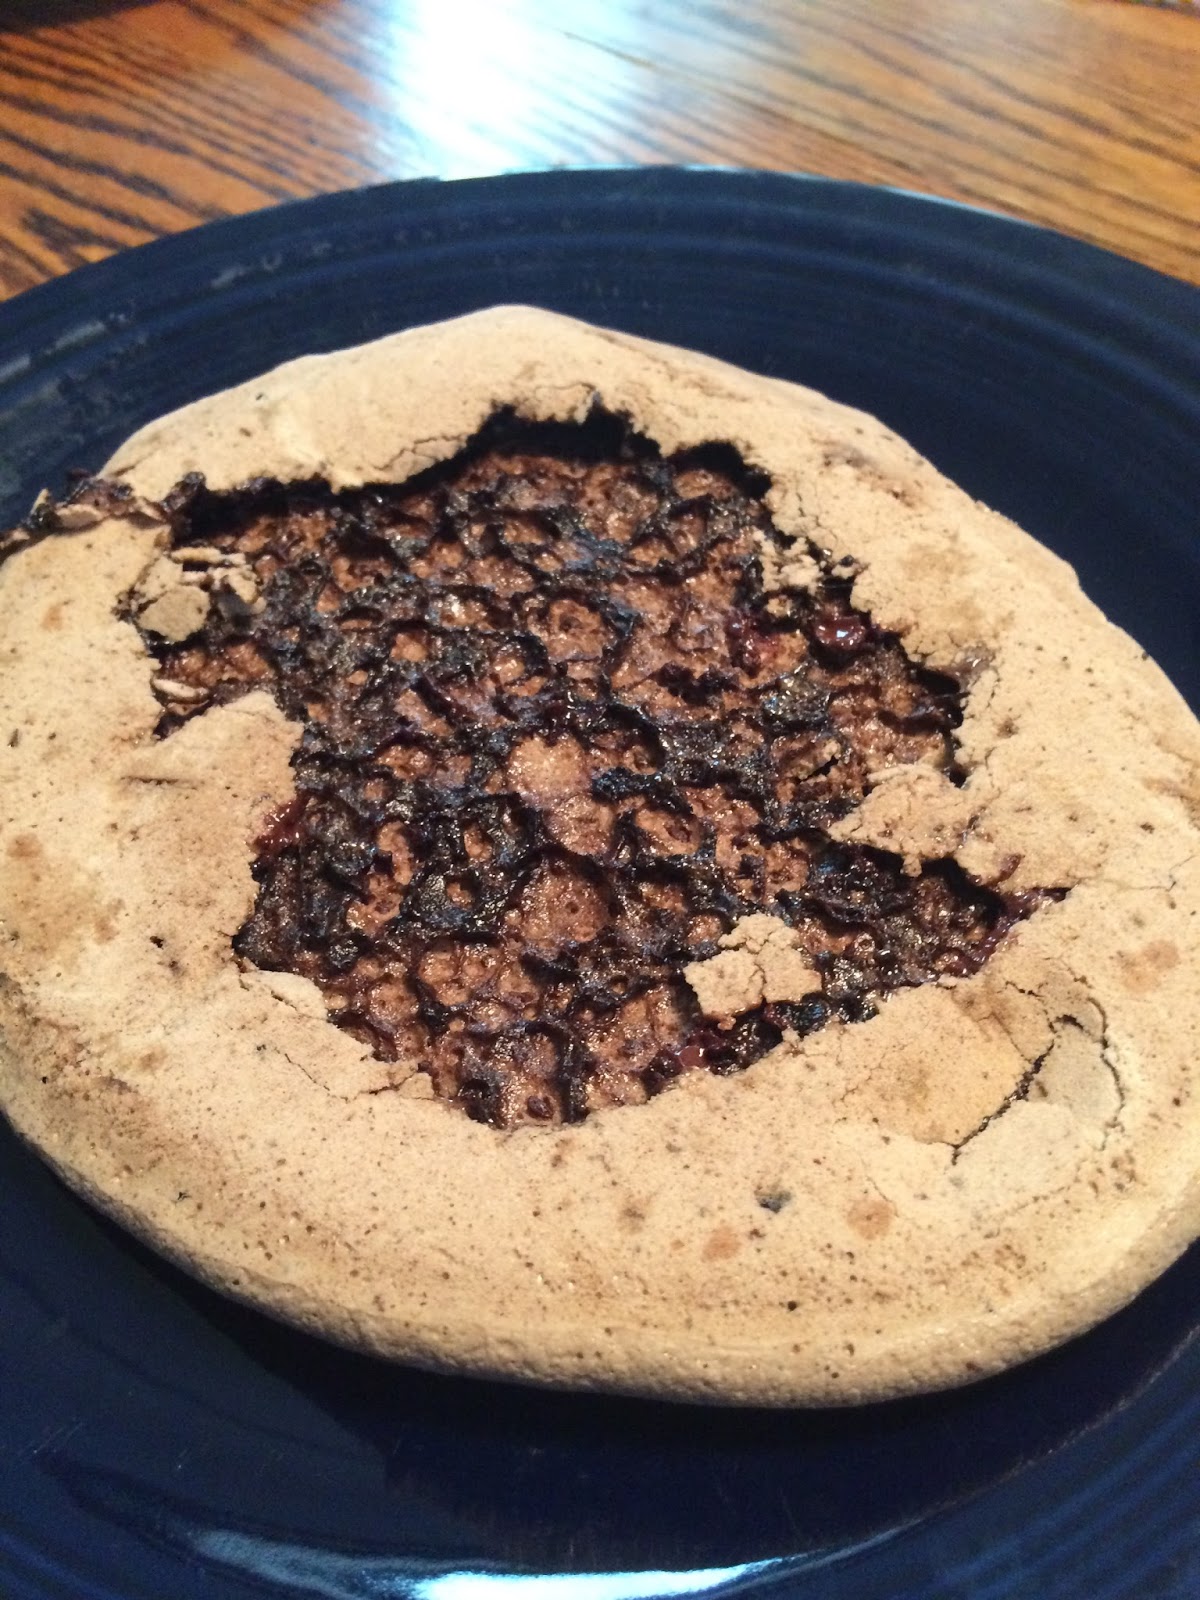
Despite the fact that I had the easier recipe, I'm the one that faced difficulties. I ground by almonds in the food processor, as instructed. The recipe said to combine the ground almonds with the other ingredients, so I just dumped in the eggs, flour, sugar, butter, and flavorings and pulsed a few times to combine. I'm not sure whether using the food processor was the error or something else, but my frangipane was decidedly not in a solid state when finished mixing. I tossed it into the fridge to cool overnight and hoped for the best.


Erica brought over the puff pastry dough the following night, and we performed the quick task of assembly. The frangipane was still giving us trouble, but it stayed solid enough to form a thin-ish layer (see above). We mastered the swirly top, and had a great time watching it bake -- first puffing up, then turning a golden brown.

 
Fortunately, we had enough leftovers to make both a perfect cake for the competition and a bonus cake (pictured above) to try that night. The one right out of the oven was amazing -- so flakey and warm, and full of almond flavor. We thought we would be a shoe-in for the office competition.

While the cake held up remarkably well (thanks uber, for getting it to the office in one piece!), it lost some of its magic when cool. I'd say we took a strong second place, but we ultimately lost to a brown butter almond cake that was pretty darn tasty.

We hope you are all enjoying a great holiday season, and wish you a happy new year!

For the month of December, Kat challenged us to make Gateaux Pithiviers. 

Gateaux Pithiviers

Ingredients
1 pound / 450g puff pastry
1 batch of frangipane
1 large egg
granulated, superfine, or powdered sugar (optional)

Directions
Beat the egg well to make an egg-wash. Add up to one teaspoon of water, if necessary, to loosen the mixture up. Divide the pound / 450g of puff pastry in half, and return one half to refrigerator. Roll out the remaining half on a lightly floured surface. Using a plate or bowl approximately 8” / 20cm in diameter and a very sharp knife, cut out a circle of puff pastry. Carefully move the pastry to a silicon mat or parchment-lined baking sheet.
Brush a ring of egg-wash around the outside of the pastry, but do not allow the egg-wash to go over the sides, as that will prevent the edges from rising prettily. Center the disk of frangipane on the pastry and place the baking sheet in the fridge to keep cool.
Roll out the second half of the puff pastry and cut a circle the same size as the bottom. Retrieve the Pithiviers from the refrigerator and place the top layer of puff pastry overtop. Quickly use your fingers to mush the two layers of pastry together without warming the pastry or allowing the filling to squeeze out.
Press two fingers of one hand into the pastry and use the back of a small knife to push an indent in between your fingers. Repeat all the way around the Pithiviers. This will form the scalloped edges Pithiviers are known for.
Brush entire top with egg-wash, again trying your best to not let the egg run over the edges. Starting at the middle of the pastry, draw long sweeping s-curves out to the edges. When you’re satisfied with your work, return to the refrigerator to chill for at least 30 minutes. Preheat oven to 425°F / 220°C / Gas Mark 7.
Bake the Pithiviers for 10 minutes at 425°F / 220°C / Gas Mark 7, and then reduce the heat to 350°F / 175°C / Gas Mark 4 and bake for another 20-30 minutes. The top should be a dark bronze color, and the filling (which you won’t be able to see) should be set. At this point, you can sprinkle sugar over the top and return to the oven at 500°F / 260°C / Gas Mark 10 for a few minutes to develop a beautiful glaze. I burned it every time, so I just skip this step now.
Allow the Gateaux Pithiviers to cool completely before serving. The taste is a little nicer when it’s warm, but the texture is better when it’s a room temperature. This can sit on the counter for a day, but longer storage is attainable using your refrigerator.  

Friday, November 27, 2015

Mmm... Cheese...


First, I'll confess: we did not completely comport with the rules of the challenge this month. Basically we were at the whims of a baby's sleeping schedule and had a limited time window on a Sunday in which to bake together, so we needed a recipe that could be prepared and eaten in a few hours. Most of the savory cheesecakes out there required a lot of waiting (like 6 hours to overnight). This one didn't. It also had no crust. But it was absolutely delicious!


Also: thank goodness for food processors. Because hand-grating all of those carrots and zucchinis would've taken ages.


Very pretty results though.


We sauteed them all up with some onions and garlic.


Then into the buttered, bread-crumbed pan. 


Not the most attractive thing ever, pre-baking.


Midway through, we took it out of the oven, dredged tomatoes in breadcrumbs and parmesan, and layered them on top. This was our "crumble."


The end product smelled divine and was pretty to boot.


We had a little difficulty getting it out of the springform because we didn't let it sit as long as we were supposed to (due to cranky baby) but in the end it turned out fine. Better than fine. Quite delectable and decadent, nicely complemented by salad and a baguette. This recipe was a keeper!

For the month of November Krista & Nicole of Two Cups of Sugar.” challenged us to make our own version of cheesecake crumble pie.

--

Savory Vegetable Cheesecake

"This delicious main-dish cheesecake comes from Mollie Katzen's "The Enchanted Broccoli Forest," which is a delightful vegetarian cookbook. A wonderful way to use us those garden veggies. It is also wonderful served as an appetizer that guests can spread onto little pieces of toast."

Ingredients
3 cups grated zucchini
3 tablespoons butter
1 cup minced onion
3 cloves garlic, crushed
1/2 teaspoon salt
1 cup grated carrot
3 tablespoons flour
1/2 teaspoon basil
1/2 teaspoon oregano
1/4 cup freshly minced parsley
1 tablespoon lemon juice
3 cups ricotta cheese
1 cup grated mozzarella cheese
1/2 cup grated parmesan cheese (please use fresh)
4 large eggs
fresh ground black pepper
2 medium tomatoes, sliced into rounds,then sliced in half so the slices look like the letter D
3-4 tablespoons breadcrumbs

Directions
Preheat oven to 375 degrees farenheit.

Butter a 10" springform pan and sprinkle with breadcrumbs, set aside.

Put the grated zucchini into a colander. Salt lightly, and let is sit about 15 minutes, then squeeze out any excess moisture.

Saute the onions in butter with 1/2 t salt. When they start to turn translucent, add the carrots, garlic, zucchini, flour, basil and oregano.  Keep stirring and cook over medium heat for about 8 minutes.
Remove from heat and stir in the parsley and lemon.

Beat the cheeses and eggs together until well blended. (Hello, Kitchenaid mixer!) When the cheese and egg mixture is nice and fluffy, fold in the veggies. Season to taste with black pepper.

Pour the mixture into the springform pan.

Bake uncovered for 30 minutes-- then pull it out for a minute.

Remember those tomatoes? Dredge them in the breadcrumbs and decorate the top of the cheesecake with them in a pretty spiral pattern. [We added Parmesan cheese to the breadcrumbs!]

Reduce the oven heat to 350 degrees, and bake another 30 minutes.

Turn off the oven and just let the cheesecake sit in there for another 15 minutes. Then, take it out of the oven and let it cool about 10 more minutes before cutting and serving.

Monday, November 2, 2015

For want of a scale (and a photo of our finished product!)

Erica and I were challenged to make macarons for this month's daring bakers event. Even though we've done this before, we were excited to try a new method. And to partake in the customary fall baking strategy -- making everything taste like pumpkin pie.

While we lacked a kitchen scale to really perfect this recipe, we did try to make sure our almonds were finely ground.


We went with pumpkin pie spice in the meringue, and pumpkin in the buttercream. And some orange food coloring for style.

Piping went well, despite our ad hoc pastry bag. 


Per the new "Italian" method, we left the finished merigues out to dry before baking.


 Sadly, however, our cookies were without the tell-tale feet, and certainly a little squishier than we would have liked. Good flavor though, especially after being chilled in the freezer.

For the month of October we got to take on one of many bakers' deepest, darkest kitchen nightmares : macarons. Our talented bakers Korena from Korena in the Kitchen and Rachael from pizzarossa made the intimidating task of mastering these French beauties a breeze.

Macaron shells using the Italian meringue method
Servings: 30 x 4cm / 1 1/2” filled macarons
Ingredients
(original recipe in grams)
140g / 4.9 oz ground almonds, room temperature
140g / 4.9 oz powdered (confectioner’s) sugar
100g / 3.5 oz egg white (from approx. 3 eggs), room temperature, divided 50/50
100g / 3.5 oz granulated (white) sugar
40g / 1.4 oz (weight) water
A few pinches of pumpkin pie spice
Directions:
1. Prepare 2 parchment (not wax paper) lined baking sheets. They need to be big enough to hold 30 x 4cm / 1 1/2” diameter shells each. (I have my piping guide under the baking paper here.)
2. Mix the ground almonds and powdered sugar (and cocoa powder, if using) together in a bowl, then grind in a food processor until you have an extra fine texture. You may need to do this in batches, depending on the size of your food processor.
3. Sift into a large bowl (I use a mesh strainer and push the mixture through with a spatula), putting any bigger pieces of almond back into the food processor to re-grind.
4. Add 50g egg whites and mix thoroughly into the almond mixture. At this point, you can add food colouring or flavouring such as vanilla seeds, citrus zest, essense, if desired. (I added 1/2 tsp vanilla paste and 1/2 tsp red powder food colouring to this batch.) Set aside.
5. In another bowl, or the bowl of a stand mixer, scrupulously clean and free of any oil or egg yolk, beat the other 50g egg whites to stiff peaks.
6. Meanwhile, put the granulated sugar and water into a small heavy-based saucepan and heat on medium-low to 118°C / 244°F, without stirring.
7. While whisking constantly on low speed (to avoid splashing hot syrup), slowly add the cooked sugar mixture to the beaten egg whites, pouring it down the inside edge of the bowl. You’ll get a bit of it hardening on the side of the bowl, but that’s okay – just leave it there.
8. Whisk at high speed until the mixture is cool, about 3 minutes. About 1 minute before the end, you can add food colouring, if not done at the almond paste stage. The mixture should increase in volume and become firm and shiny, and it should be thick and marshmallowy when you lift the whisk.
9. Scrape the meringue onto the almond mixture and incorporate with a rubber or silicone spatula. You do actually want to get a lot of the air out of the mixture – you do this by folding and squashing the mixture against the side of the bowl, rotating the bowl a quarter turn with each fold. Be sure to firmly scrape the bottom of the bowl with the spatula, so you don’t leave a layer of almond paste there.
10. Mix until you have a homogenous batter that runs from the spatula in a thick ribbon.
11. Transfer the mixture into a piping bag fitted with a 7 – 9mm / #10 - #12 plain round tip (this is best done in two batches, so you don’t overfill the bag). Pipe 60 equally sized rounds, about 4cm / 1 1/2” in diameter, in staggered rows onto the prepared sheets. Hold the piping bag upright with the tip just above the sheet and pipe without pulling upwards or swirling in circles, so the batter comes out in a round blob around the tip, and give a little sideways flick at the end to break the stream.
12. Tap the baking sheet firmly on the bench several times to release air bubbles and obtain a smooth surface. If you have any tips sticking up, press them gently down with a damp fingertip.
13. Leave the tray to rest at room temperature for at least 20 minutes until a slight skin forms. If you touch it, it should be only just tacky.
14. Meanwhile, preheat oven to 150°C / 300°F / Gas Mark 2. Bake the macarons in the centre of the oven for 18 minutes (20 minutes if using cocoa in the shells), one sheet at a time, turning the sheet half-way.
15. Remove from oven and remove the parchment from the tray with the shells still on it and place on a cooling racks for at least 30 minutes, until completely cool, then remove macaron shells carefully from the parchment.
16. If not filling straight away, store in an airtight container at room temperature, separating layers with parchment. Otherwise, fill and store in an airtight container in the fridge to mature for at least 24 hours before eating.

Swiss meringue buttercream frosting
Servings: about 2 cups of buttercream (approx. twice the amount needed to fill 30 macarons, but the excess can be frozen)
Ingredients
1/2 cup / 100g / 3.5 oz granulated sugar
2 large egg whites
pinch salt
1 1/2 sticks / 3/4 cup / 180 g / 6 oz unsalted butter
Directions:
1. Cut the butter into 1/2 inch / 1 1/2cm cubes and set out to soften to room temperature.
2. Put the sugar, egg whites, and salt in a large, scrupulously clean heatproof bowl over a saucepan of simmering water. Whisk the mixture constantly (this is to prevent it from turning into scrambled eggs, not to beat it into a meringue) and heat it until the mixture is hot to the touch and the sugar has dissolved completely (about 130˚F / 54°C).
3. With an electric mixer, beat the egg white mixture on medium-high speed until it turns into a thick, fluffy, stiff-peaked meringue (mine never quite reaches stiff peaks and still turns out fine). Test the temperature of the meringue with your finger – it should be completely cooled to room temperature and not warm AT ALL. If it is still warm, keep stirring on low speed until the mixture is completely cool to the touch. (This is very important because the next step is to add butter, and if the meringue is warm it will just melt rather than emulsify into a buttercream.)
4. While the meringue cools, check on your softening butter cubes: you should be able to squish the butter with your finger. You want it soft enough to spread but not at all melted. The key to successful Swiss meringue buttercream is to have the meringue at room temperature and the butter just soft enough to mix in.
5. Once the meringue is cool and the butter soft, turn the mixer to medium-low speed and begin adding the butter to the meringue one cube at a time, waiting until each cube is incorporated before adding the next. Your meringue may collapse and look kind of curdled and shiny: this is normal. Just keep slowly adding the butter, one cube at a time, and continue mixing. It will start looking thicker and chunky, and then suddenly it will be buttercream. Once all the butter is added, increase the speed to medium and mix until it is smooth, thick, and fluffy. 


Sunday, September 27, 2015

Lucky Irish Soda Bread


It's nice when a challenge goes smoothly and uneventfully, and ends up quite tasty. Sara and I had both made this type of bread before and in the end it's not a terribly difficult recipe -- pretty much flour, baking soda and buttermilk.


The dough was not especially pretty to look at and it was rather tough to handle. After about 30-40 minutes in the oven, however, it came out smelling wonderful and looking great. So great, in fact, that we dug right into it along with our semi-Irish feast -- sausage, salad, Irish and English cheeses, cornichons, Irish butter, tomato jam and mustard, plus cider and beer -- without taking any pictures.


So here's the bread remaining after Sara and I and our husbands had at it, and after I cut it the rest in half to send home with them. Just a little left -- probably the best testament to a successful challenge!

For the month of September Meredith from the Poco Loco Olsons challenged us to experiment with soda bread.
--

Irish Country Bread

Servings: 12 or more, based on how the loaf is sliced

Ingredients:
  • 2½ cups (625 ml) sour milk or buttermilk
  • 2 cups (500 ml) (300 gm) (10½ oz) whole wheat four (see note above on how to measure flour)
  • 4 cups (1000 ml) (600 gm) (21 oz) all-purpose (plain) flour (see note above on how to measure flour)
  • 2 teaspoons (10 ml) (10 gm) baking soda
  • 1 teaspoon (6 gm) salt
Directions:
  1. Preheat oven to hot 450°F/ 230°C/gas mark 8 and line a baking sheet with parchment paper.
  2. Mix the dry ingredients in a medium-sized bowl. (I do this by hand, but you could use a mixer if you’d prefer.)
  3. Make a well in the middle of the dry ingredients.
  4. Pour the sour milk/buttermilk into the well.
  5. Mix the dough until the flour is completely incorporated. (It will be very stiff. I find it helpful to knead the dough by hand a few times while it is still in the bowl to make sure all of the flour is incorporated before moving on to the next step.)
  6. Transfer the dough to the prepared baking sheet.
  7. Pat or roll the dough into a circle shape that is approximately 1 inch (2½ cm) thick.
  8. Using your fingertips or the blunt end of a wooden spoon handle, make several dimples in the top of the dough. (This is very similar to the technique used when making focaccia bread.)
  9. Place the baking sheet on the middle rack of the preheated hot oven and bake for 30 minutes.
  10. Reduce the heat to moderately hot 400°F/200°C/gas mark 6. Pull the baking sheet out from under the dough, so the parchment is directly on the oven rack. Bake for 10 more minutes or until the top is golden brown.*
* Note: We baked it for about 30 min. and it was definitely done, so we skipped the last 10-min. step with no apparent ill effects. 

Tuesday, July 28, 2015

Yummy Yafawi Sfeeha


Though neither of us were familiar with the particular dish on hand for this month's challenge, we knew from the components that we would (likely) be in for a tasty treat. The yafawi sfeeha -- also known as "meat pies from Jaffa" in Palestine -- are traditionally made with lamb, but we opted for a vegetarian savory version with feta cheese. 

I mixed up the dough in the stand mixer the day before, and left the dough to chill in the refrigerator overnight. I took the tray out the next morning, so the dough was very relaxed and at room temperature when Erica came over. 


As you can see, it was super easy to work with -- we essentially just pushed it out into very thin circles. No rolling or tossing of any kind was required. Lesson learned on the development of gluten, perhaps?


Next we mixed up some fresh feta cheese, egg, parsley and mint for our filling. We spread this onto the thin dough envelopes, and then rolled them up into pinwheels. 


We popped them in the oven for a brief stint, waiting in anticipation as the kitchen started to smell delicious. 


These were a real treat. We started by serving just one a person, but by the end Erica and our husbands had polished off all twelve. Well done. I can imagine that they would be quite good with lamb or half lamb, half cheese, but these were awesome on their own. 

The July Daring Bakers’ Challenge was brought to us by Manal from Manal’s Bites. She introduced us to an authentic Palestinian dish from Java that is served as a main meal along with a bowl of soup or a salad. The “Yafawi Sfeeha” or also known as “Milwayeh” which means twisted, is crispy yet tender and full of flavor. 

Dough

Ingredients: 
3 cups (750 ml) (420 gm) (15 oz) all-purpose (plain) flour, scoop flour using cup measure then level 
1 teaspoon (5 ml) (6 gm) salt 
1 tablespoon (15 ml) (15 gm) (½ oz) sugar 
3 tablespoons (45 ml) powdered milk (you can substitute this with warm milk, you will need less water if using milk) 
3 tablespoons (45 ml) vegetable oil 
About 1 cup (250 ml) warm water for kneading 
Melted ghee (or olive oil) to stretch the dough (ghee gives a great texture and flavor). 

Directions: 
1. Mix flour, salt, sugar, powdered milk and vegetable oil then start adding the warm water until you get a tender and slightly sticky dough. Kneading will take about 8 min on a stand-up mixer or 12 min by hand. you might need more depending on where you live and the kind of flour you are using). 
2. Form the dough into small golf-ball-sized balls. Place on a baking sheet that is very well greased with ghee or olive oil and pour some more (oil or ghee) over dough. Cover and let rest at room temperature for few hours at least (or overnight). 
3. Prepare filling in the meantime. 
4. After you have your filling ready, use some of the ghee to brush a round tray (the surface that you will be working on). Take one piece of dough and using your hands, gently start spreading it as thinly and evenly as possible. 
5. Once that is done fold the upper side to the middle, then fold the opposite side to the middle as well. 
6. Spread your filling in a long line across the dough. Roll like a long tight rope making sure that it is tight enough to ensure no filling escapes. Then taking one end start rolling the rope towards the inside in a spiral shape (see photo). 
7. Put some more ghee on your baking sheet and place the done Sfeeha onto the baking sheet. Continue making the rest of your Sfeeha using ghee to keep it nice and moist. 
8. Preheat oven to moderately hot 400°F/200°C/gas mark 6 and bake Sfeeha for 15-20 minutes till golden brown. Serve hot or at room temperature with a bowl of soup during winter or a salad and Greek yogurt in summer time. 

Cheese Filling

Ingredients: 3-4 cups Nabulsi cheese, crumbled (You can use feta or Halloumi if you like but you need a reasonably hard and salty white cheese) ½ cup Italian parsley, minced (you can use fresh mint or fresh za’tar) 1 egg, beaten Black pepper 

Directions: Mix ingredients and your cheese filling is ready.

Saturday, June 27, 2015

Renegade Adventures in Vegan and Non-Vegan Baking


Sara and I were loose cannons this month. We were renegade bakers. Kitchen outlaws. We'd essentially already made the Daring Bakers' challenge this month, a Charlotte Royale, so we decided to try something new. I'd pinned this S'mores Pavlova a few days before our baking date and it seemed like just the thing. Plus Sara and I were extremely curious to try our hands at making vegan "meringue" from chickpea water.


We're pretty much pros at egg-separating and making meringue at this point. The pavlova portion of the dessert involved some cocoa powder -- yum. And, strangely enough, balsamic vinegar.


We actually took the time to sift something for once.


It also involved some very tasty dark chocolate, which we folded in.


We decided to make the three pavlovas required by the recipe out of egg whites and then make one extra pavlova using the chickpeas just to see how it turned out. The chickpea water was pretty yucky looking and bean-y smelling. 


Weirdly, though, it beat right up into a frothy, white egg-y like substance, even though I mistakenly threw most of the ingredients into the bowl prior to beating. (I was supposed to whip up the chickpeas first, then slowly add the sugar, vanilla, etc.) Once all the sugar and chocolate was added, the bean-y flavor was barely noticeable.


Unfortunately, the end product wasn't quite right. We think we didn't bake it long enough. The outer shell was spot-on, but the interior was a little too goopy and stuck to the parchment paper. The chickpea pavlova was a little flatter than its egg-made cousins, but in a pinch, or if a vegan were coming over for dessert, both of us agreed that this would actually work as a substitute. Amazing!


Anyway, we had three eggs-cellent pavlovas to work with. We just had to layer 7-minute marshmallow frosting on a pavlova, give it some time under the blow torch, and then sprinkle it with graham crackers.


Mmm... blowtorched marshamallow...


Then we did it again...


And a third time. (My husband, TJ, was very happy to take a couple turns with the blowtorch.)


The finished product was really lovely looking.


We were a little nervous about cutting it, but it worked out just fine.


It was quite delicious, although we both felt a bit over-sugared afterwards. This would be a perfect dessert to bring to a summer party -- easy to make, impressive to look at, and really, really, really good to eat.


What we did not make this month:

For the June daring bakers challenge Rebecca from BakeNQuilt.com challenged us to make Charlotte Royale and Charlotte Russe from scratch. Savory or sweet Charlottes were definitely tasty showstopper

Thursday, May 28, 2015

Four month streak? Lamingtons

Those of you who have followed our blog for some time know that we don't always have the best luck with daring baker's challenges. Sometimes things take forever and then just aren't worth the effort. Sometimes they taste good, but look atrocious. Sometimes we end up with lasagna gum or gingerbread jails.

We, however, are on a hot streak. Those Siopoa buns were amazing. I still can't stop thinking about the tarte tatin. And that focaccia is going to be a kitchen staple, I can feel it. We were ripe for a failure, especially given that this recipe called for cornstarch instead of flour (uh, what?).

But the lamingtons were surprisingly delicious, and not all that terrible looking!

Erica kindly whipped up the inner cake part overnight (so she braved the cornstarch part).

While we had a bit of trouble cutting some of the middle pieces, the edges were just perfect.

Cake is always improved with 3.5 cups of powdered sugar, mixed with cocoa and butter. :-)

Finally, we coated these little logs in coconut, which we sent through the food processor to get the right texture.

Even though the recipe said to set for 2 hours, we tried right away. They were pretty good.

But, apparently that instruction was in there for a reason, as they turned from good to awesome as they set -- the chocolate sauce absorbed and hardened a bit, making a nice toothy shell around the soft, sweet cake. Delicious!

Think we can go 5/5?


Classic Lamingtons

Sponge Cake
Servings: 24

Ingredients:
5 large eggs, at room temperature
1 cup (240 ml) (225 gm) (8 oz) castor (superfine) sugar
Pinch salt
1 teaspoon (5 ml) vanilla extract
1 ¼ cups (300 ml) (200 gm) (7 oz) cornflour (cornstarch)
1 ½ teaspoons (8 gm) baking powder
1 tablespoon (15 ml) (15 gm) (½ oz) butter, melted (optional)
2¾ cups (660 ml) (250 gm) (9 oz) unsweetened desiccated coconut, to assemble

Directions:
Preheat oven to moderate 180°C/350°F/gas mark 4.
Prepare a 4 ½ cm (1¾ inch) deep, 23cm x 33cm (9”x 13”) baking pan by lining with non-stick paper.
In a stand mixer bowl place eggs, sugar and salt. Using the whisk attachment, beat on high for 15 minutes.
While the eggs and sugar are beating sift the cornflour and baking powder at least 3 times.
After 15 minutes add vanilla and beat on high for another 5 minutes. The mixture should have at least tripled in size, be light in colour and very foamy.
Sift flour mixture over the egg mixture. I like to use a whisk but you can also use a large metal spoon to lightly fold the flour in. Some people like to use a wooden spoon but I find it too heavy. Heavy handling now will result in a flat tough sponge. If you are using butter, thoroughly fold it in now but lightly.
Spread mixture into your prepared pan and smooth out evenly. Some cooks at this stage drop the pan onto the bench top to even out the air bubbles! I have never had that much courage!
Bake in preheated moderate oven for 22-25 minutes. The sponge will rise quite a lot but then settle back down. Don’t be tempted to open the oven to peak. I also warn the family to walk gently past the oven! When baked the sponge will have shrunk very slightly from the sides and should feel springy when pressed gently.
Turn the sponge out immediately onto a wire rack to cool and reverse sponge so as not to mark the top. Allow to cool. It is best to keep the cake for a day before making the Lamingtons as the cake will be easier to handle.

Chocolate icing
Ingredients:
3 ¼ cups (780 ml) (400 gm) (14 oz) icing (powdered) sugar
1/3 cup (80 ml) (40 gm) (1-1/3 oz) cocoa powder
1 tablespoon (15 gm) (15 gm) (½ oz) butter, melted
½ to ¾ cup (120 ml to 180 ml) milk

Directions:
Sift the icing sugar and cocoa into a heatproof bowl. Stir in the butter and ½ cup milk. Set the bowl over a pan of hot water. Stir until icing is smooth adding more milk to thin the icing if needed. I find I need more than ½ cup but not quite ¾ cup of milk.

To assemble the Lamingtons:
Cut the sponge cake into 24 rectangular pieces – 6 across and 4 down. To be particular you can trim the crusts.
Keep the icing over the hot water to keep it melted. Place desiccated coconut in a shallow bowl.
Dip each piece into the chocolate icing
Allow excess to drip off then toss gently into the coconut.
Stand cakes on a wire rack to set, about 2 hours.


For the May challenge Marcellina from Marcellina in Cucina dared us to make Lamingtons. An Australian delicacy that is as tasty as it is elegant.

April Genius and Fail

I listen to an excellent mama podcast that asks listeners to report their genius and fail moments for the week, in an effort to celebrate/sympathize with the daily life of being a parent. April's challenge was certainly a genius and fail moment for me.

Genius moments? I made homemade focaccia! With a two-month old! Friends came over for dinner! The focaccia was amazing! I even took some pictures!


Fail moment?

Totally forgot to blog about it.

And dear, sweet Erica didn't want to bring up my failures, so we didn't have a post last month.

So, apologies! But this focaccia (technically, it's fugazza, the Argentinian version) deserves a post, because it's so good and so easy. Here's the recipe, so you can now make it in your own kitchens. Do it now. 

Fugazza

Servings: 16 slices
Preparation time: 90 minutes (including proofing)
Baking time: 20 minutes

Ingredients
2¾ cups (660 ml) (12-1/3 oz) (350gm) bread flour
150ml (10 tablespoons) olive oil, divided
2 teaspoons (10 ml) (6 gm) kosher or sea salt
2 teaspoons (10 ml) (6 gm) instant dry or active dry yeast
1 teaspoon (5 ml) (5 gm) sugar
1 cup (250 ml) warm water
1 large white onion
2 teaspoons (10 ml) (6 gm) dried oregano
grated Parmesan (optional)
thinly sliced mozzarella (optional)

Directions:
If using active dry yeast: Pour the warm water (100-105° F/38-40°C) into a small bowl. Stir in the sugar and yeast. Set aside for 5-10 minutes, until frothy. If using instant dry yeast: Add the yeast and the sugar with the flour.

Whisk together the flour and salt in a large mixing bowl or the bowl of a stand mixer, add 5 tablespoons (75 ml) of olive oil and mix together briefly using a spoon or the dough hook.
 
Add the yeast and water mixture and begin to knead. The mixture should come together as a soft, stretchy dough, pulling away from the sides of the bowl. Add a bit more flour if mixture is too wet, or a bit more water if mixture seems dry or too firm. Knead for 5-10 minutes, until dough is smooth, soft and elastic.

Transfer the dough to a large, clean, oiled bowl. Cover with plastic wrap and let dough rise until doubled in size, about 1 hour.

While the dough is rising, peel, halve and slice the onion lengthwise into very thin strips. Submerge the sliced onion in a bowl of cold, salted water and soak for 30 minutes. Drain onions well and dry with paper towels.

Preheat oven to hot 450°F/230°C/gas mark 8 with a rack in the middle.

Once it has risen, punch down the dough and shape into a smooth ball. Pour 3 tablespoons (45 ml) of olive oil into a large cast iron skillet or medium sized pizza pan with at least 1”/2.5cm sides. Place the ball of dough in the middle of the pan and press out gently with your fingers. Let dough relax for about 10 minutes.

Continue to press dough out into the pan, letting it relax for a few minutes each time as necessary, until dough covers the bottom of the pan. It should take 3 – 5 repetitions, depending on the size of the pan.
Sprinkle the onions over the top of the dough. Drizzle a tablespoon (15 ml) or two (30 ml) of olive oil over the onions, and sprinkle with the dried oregano, rubbing it between your fingertips while doing so to bring out the flavour.
 
Place the fugazza in the centre of the preheated hot oven and bake for about 20 minutes, until the edges start to turn golden brown. If desired, remove fugazza from oven after 15 minutes and top with thin slices of mozzarella and sprinkle with grated Parmesan then return to oven and bake until the fugazza is golden brown and crispy around the edges. Brown the onions under the oven grill or broiler for the last 2 - 3 minutes of cooking, if desired. 
 
Remove from the oven, allow to cool enough to handle and cut into wedges or squares to serve.

For the month of April Rachael of pizzarossa and Sawsan of Chef in Disguise took us on a trip to Italy. They challenged us to try our hands at making focaccia from scratch.